
- Introduction
- Setting up the server
- Creating the entities
- Creating the database schema
- Loading the entities
- Creating new entities
- Deleting entities
- Updating entities
- Conclusion
In FlashDevelop or Flash Builder create a new Flex 4 project and add the Flextrine client side library (in flextrine/src of the Flextrine download) to the classpath of your project. Alternatively you can use the compiled flextrine/bin/flextrine.swc. Now return to the Flextrine manager and click on GENERATE AS3 CLASSES. You will be prompted to download a zip file – extract its contents into the src directory of your project. You should now have AS3 versions of vo.ContactGroup and vo.Contact for use in your Flex application.
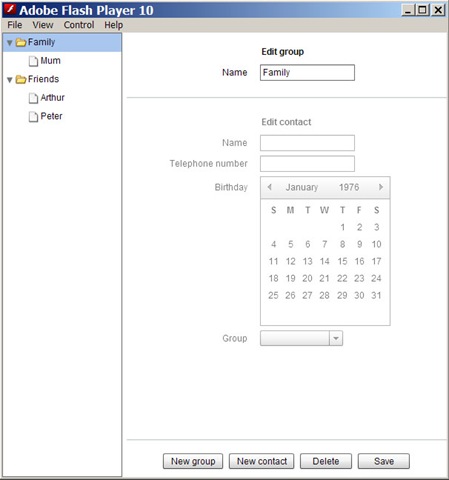
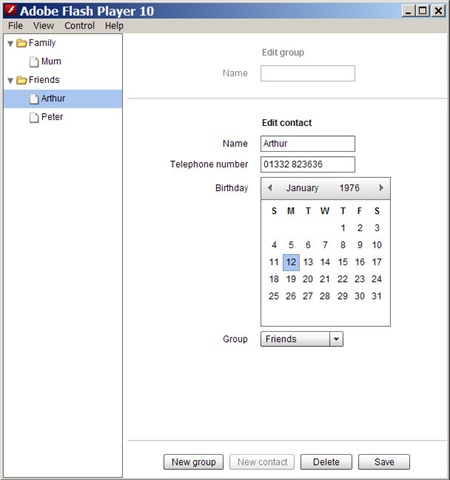
For reference, here are a few screenshot of what we will be working towards. The tree on the left will show the groups and contacts, and the area on the right will have the group editor at the top and the contact editor below. We will also have some buttons to create, delete and save contacts and groups.
Create the Main.mxml entry class
We will begin by creating the Main.mxml entry class for our application. To start with we will just create the basic MXML Application with a creationComplete event listener that configures Flextrine’s central class – the EntityManager. For our simple application the only configuration that is required is to set the URL of gateway.php in the Flextrine server side component – in this case http://localhost/contacts/gateway.php.
<?xml version="1.0" encoding="utf-8"?>
<s:Application xmlns:fx="http://ns.adobe.com/mxml/2009"
               xmlns:s="library://ns.adobe.com/flex/spark"
               xmlns:mx="library://ns.adobe.com/flex/mx"
               xmlns:local="*"
               creationComplete="creationComplete()">
  <fx:Script>
    <![CDATA[
      import org.davekeen.flextrine.orm.Configuration;
      import org.davekeen.flextrine.orm.EntityManager;

      private var em:EntityManager;

      /**
       * Initialize the Flextrine EntityManager, set the dataprovider of the tred th      ContactGroups.
       */
       private function creationComplete():void {
         // Setup the entity manager
         var configuration:Configuration = new Configuration();
         configuration.gateway = "http://localhost/contacts/gateway.php";

         em = EntityManager.getInstance();
         em.setConfiguration(configuration);
       }
    ]]>
  </fx:Script>
</s:Application>
Now we’ll add the GUI. We’ll add a Flex Tree on the left with id tree, along with the buttons and the layout.
 <?xml version="1.0" encoding="utf-8"?>
 <s:Application xmlns:fx="http://ns.adobe.com/mxml/2009"
                xmlns:s="library://ns.adobe.com/flex/spark"
                xmlns:mx="library://ns.adobe.com/flex/mx"
                xmlns:local="*"
                creationComplete="creationComplete()">

     <fx:Script>
         <![CDATA[
      import org.davekeen.flextrine.orm.Configuration;
      import org.davekeen.flextrine.orm.EntityManager;

      private var em:EntityManager;

      /**
       * Initialize the Flextrine EntityManager, set the dataprovider of the tree and d the ContactGroups.
       */
      private function creationComplete():void {
              // Setup the entity manager
              var configuration:Configuration = new Configuration();
              configuration.gateway = "http://localhost/contacts/gateway.php";

              em = EntityManager.getInstance();
              em.setConfiguration(configuration);
       }

       ]]>
           </fx:Script>

           <s:HGroup width="100%" height="100%">
               <!-- The groups and contacts tree -->
               <s:VGroup height="100%">
                   <mx:Tree id="tree" width="100%" height="100%" />
               </s:VGroup>

               <s:VGroup width="100%" height="100%">
                   <!-- The editors will go here -->

                   <mx:Spacer height="100%" />

                   <mx:HRule width="100%" />

                   <!-- The buttons -->
                   <mx:ControlBar width="100%" horizontalAlign="center">
                       <s:Button label="New group" />
                       <s:Button label="New contact" />
                       <s:Button label="Delete" />
                       <s:Button label="Save" />
                   </mx:ControlBar>
               </s:VGroup>
           </s:HGroup>

       </s:Application>
Loading the contacts into the tree
Now its time to load some data into the tree. Obviously at this point there isn’t any data to load so for the moment we’ll manually add some into the database so we have something to see. Execute the following SQL against the *contacts *database to create some test data. This creates two groups and three contacts, just like in the screenshots at the top of this section.
INSERT INTO `contact` (`id`,`name`,`telephoneNumber`,`birthday`,`contactGroup_id`) VALUES
  (1,'Arthur','01332 823636','1976-01-12',2),
  (2,'Mum','07884 763623','1976-01-13',1),
  (3,'Peter','0131 827 3625','1977-12-06',2);

INSERT INTO `contactgroup` (`id`,`name`) VALUES
  (1,'Family'),
  (2,'Friends');
At this point we should talk about the concept of Flextrine’s entity repositories. Every entity in your application has its own EntityRepository, so for our application we have one EntityRepository for ContactGroup and one for Contact. Entity repositories perform a number of functions:
- First and foremost entity repositories provide local storage for your entities. Each EntityRepository has an attribute called entities which is an ArrayCollection containing the entities currently in existence in your application.
- Secondly entity repositories make sure that there is only ever one instance of a particular entity in existence at any one time.
- Finally entity repositories watch their entities for changes and mark them for updating when they change.
Add the following lines to the end of creationComplete() remembering to add import vo.ContactGroup to the top of the script tag.
tree.dataProvider = em.getRepository(ContactGroup).entities;
em.getRepository(ContactGroup).loadAll();
The first line sets the entities of the ContactGroup EntityRepository as the dataProvider of the tree. Obviously at this point there are no entities in the ContactGroup repository, but Flextrine is very careful to respect Flex databinding throughout its lifecycle so in fact it doesn’t matter that entities is currently empty. Any Flex component bound to the entities will automatically update themselves when the repository changes with no extra work required.
The second line calls the loadAll() method on the ContactGroup repository. As you would expect this loads all the ContactGroups into the ContactsGroup repository and Flex databinding will take care of updating the tree once the load is complete. By default Flextrine runs in EAGER mode, which means that when loading entities it will follow all associations and load any linked objects, so in fact loading the ContactGroups will also load all the Contacts. Flextrine also supports LAZY loading which won’t automatically follow associations and requires you to to explicitly request unitialized entities; see Loading Associations for more details.
If you now run the application it will look like this.
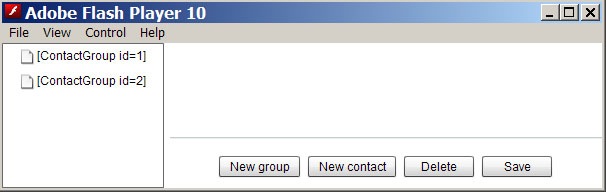
We can see that the two ContactGroups are loading from the database and that Flex databinding has updated the tree automatically to reflect the loaded entities. Unfortunately the tree doesn’t realise that it should be showing contacts as children of the contact groups, so we need to explicitly tell it so by adding a children attribute to ContactGroup. Flextrine allows you to add logic to your entities by seperating Flextrine specific code into an ‘EntityBase’ class, and then creating an empty main entity class which you can ammend. The idea behind this is that if you later update your entities you can replace the EntityBase without losing any functionality you added to the main entity class.
Open up vo/ContactGroup.as and add a getter function that simply returns the contacts:
package vo {
  import mx.collections.ArrayCollection;

  [RemoteClass(alias="vo/ContactGroup")]
  [Entity]
  public class ContactGroup extends ContactGroupEntityBase {
    public function get children():ArrayCollection {
      return contacts;
    }
  }
}
We also want the labels in the tree to show the name property of both ContactGroup and Contact so add labelField=”name” to the Tree component in Main.mxml:
<mx:Tree id="tree" width="100%" height="100%" labelField="name" />
Lets see how we can create new entities.